
~5 min read
Maybe you finally bought yourself that guitar you’ve always wanted.
Or maybe a family member gave your child a guitar for their birthday.
Perhaps you played around with a guitar in the past, but you’re ready to get serious.
Now comes the next question: “How do I start learning the guitar?”
While learning to play the guitar is a rewarding, ongoing journey, we want to help you get started. Here are seven steps to get you (or your kid) going on the guitar.
1. Learn the parts of your guitar.
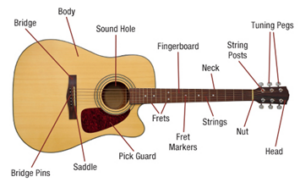
Before you even begin to play the guitar, it’s important to know all the parts so you can experience the full range of what your instrument can do.
Take some time to familiarize yourself with your guitar, from the tuning pegs to the bridge. When you’re comfortable with your guitar, you’re able to focus on other important elements of playing.
2. Learn the strings of your guitar.
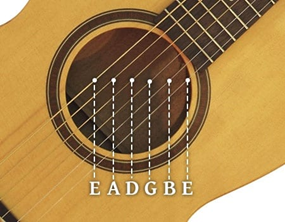
The next step when you start learning the guitar is to memorize the note names of each string. Then, you’ll be able to build out chords, and eventually songs.
While there are some specialty guitars, most guitars have six strings. Starting with the “top” of the guitar neck (which is actually the lowest-pitched string), the order of strings goes: E – A – D – G – B – E
The bottom string (the highest-pitched string) is also an E, exactly two octaves higher than the low E. Of course, there are instances when guitar players might opt for an alternative tuning, but this is the most common way to tune your guitar.
3. Learn to tune your guitar.
Have you ever heard a guitar that just sounded off ? You could tell the player was probably playing the right chords or notes, but it still made you cringe?
That’s why this next step of learning to play the guitar is so critical–because none of what you’ve learned so far will matter much if your guitar is out of tune.
There are two ways to tune your guitar. First, you can use an electric tuner. We recommend students begin with this option since you’re still developing your ear for the guitar. Here’s a highly recommended and affordable tuner that clips onto your guitar.
Once you’re comfortable hearing pitches, you can try out the second way to tune your guitar: tuning by ear. You’ll start with the lowest-pitched E string, and count up five frets. You should now be playing an A on the E-string. Pluck that note and the next string up, the A-string, and listen for any differences. Adjust the tuning peg of the A-string to match the pitch of the A played on the E-string.
Once the pitches match perfectly, you can count up five frets to play a D on the A-string and compare that note to the D-string, adjusting the pitch of the D-string as needed. You’ll repeat this process down the guitar until you get to the G-string. For this one string only , you’ll count up four frets to find a B, and then you’ll compare the B-string to that note. After that string, you’ll go back to counting up five frets.
You’ll know you’ve done a good job tuning if the high E-string and low E-string sound in tune together.
4. Learn to read basic guitar chord charts.
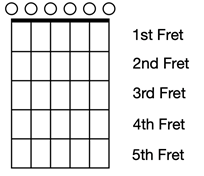
Guitar chord charts will show you how to position your fingers on the neck of the guitar to create a chord. There are a few things to know about reading chord charts:
- The vertical lines on the grid represent the strings of your guitar, with the lowest-pitched E on the right, moving up pitches as you go left.The horizontal lines represent the frets on your guitar, with the top line being the first fret (not the nut).
- The black dots show where you should place your fingers on the neck.
- The “x” at the top indicates a string you should not play when you strum or pick. So, carefully strum around that string.
5. Learn some basic open chords.
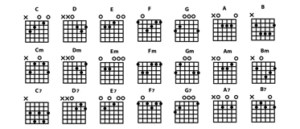
Once you can read chord charts, it gets a little easier to learn and practice some basic chords. With just three or four chords down, you can perform entire songs!
For example, you can play the majority of the song “Sweet Home Alabama” by Lynyrd Skynyrd with just a D – C – G.
6. Practice your strumming patterns.
Strumming patterns bring rhythm to your song. Each pattern gives your song a different feel–from blues to pop, jazz to rock. Here are some basic guitar strumming patterns to get you started. Remember to practice through each one slowly (with a metronome), only speeding up once you feel you’ve got it down.
Note: We recommend you start strumming with a pick, as it will give you better control of your strumming pattern.
As you practice, you may find your left-hand fingers starting to hurt from holding down the strings. Don’t worry! In time, you’ll develop calluses on your fingers that will keep them from discomfort.
7. Find a local instructor.
Now that you’ve come this far in learning to play the guitar, it’s important to connect with a teacher who can guide you. A guitar instructor can help you learn the songs that excite you and reach your goals quickly. They can also help you avoid some of the mistakes that beginning guitar students make. Set yourself up for long-term success with a local guitar instructor.
Why Guitar Students Love Learning in Queen Creek and Mesa, AZ
Learning guitar in Queen Creek and Mesa, Arizona offers more than just lessons – it’s a launchpad into a thriving music community. These fast-growing East Valley communities blend their unique Arizona charm with a grassroots music scene that welcomes everyone,no matter if you’re a beginner guitarist or a seasoned guitar player. This makes it the perfect setting for anyone starting their guitar journey, no matter their age or musical goals.
The local music scene is filled with open mics, youth performance showcases, and community concerts that encourage new players to test the waters in a supportive environment. For students learning acoustic guitar, electric guitar, or even exploring classical guitar, these real-world opportunities help develop confidence and stage presence. Plus, they make learning guitar far more dynamic than just playing in a bedroom.
Musicians Made takes full advantage of this local vibe. Our programs don’t just focus on the technical side of guitar playing – like chord shape, chord progression, and music theory – we create real pathways to performance. Many of our students go on to join a student rock band or perform locally with their peers. This hands-on experience playing guitar complements structured learning and keeps motivation high.
We believe there’s huge value in face-to-face lessons. Working directly with an instructor allows students to get immediate feedback on everything from their guitar pick technique to refining beginner guitar chords. If you’re struggling with your first step to playing guitar, or just want to transition smoothly into more advanced styles, an in-person guitar lesson helps you make real progress, fast.
What also sets us apart is how we connect learners with real working musicians. Our team consists of passionate professionals who are not only excellent educators but also active performers.
You can meet our guitar instructors and see just how connected they are to the local music world. Whether you’re looking for guitar lessons in Queen Creek or prefer Mesa guitar lesson programs, we’ll help you find the right fit.
If you’re wondering why guitar lessons are worth it, Queen Creek and Mesa, Arizona proves the point. With a vibrant music culture, personal instruction, and a community that truly welcomes new players, you’re not just taking a guitar course – you’re stepping into a city where your musical journey has room to grow.
If you’re ready to start learning the guitar, try out an introductory lesson today. We currently offer a FREE introductory lesson for first-time students. Get in touch with Musicians Made and let us match you with the perfect local instructor.